Monday, February 1, 2021

Easy Lazy Daisy

Hi! In our Nyonya Kopi-holic design, there is a lazy daisy to be stitched on the top of the coffee 'sock'/ tapis.


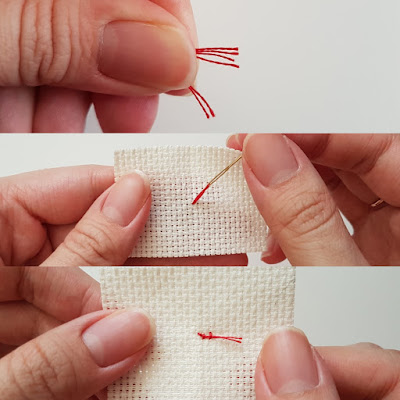
Today, I'll quickly take you through how to stitch a lazy daisy. 

Top to bottom from L-R

1. Bring your thread up at the indicated hole.

2. Bring your needle back into the same hole and out at the desired spot.

3. Wind your thread under the needle and pull through gently.

4. This will result in a loop, put your needle into the nearest available hole to tack the loop in place.

You can repeat this stitch with more strands of thread to make pretty flowers for any of your stitchy projects, too! They're really easy lazy daisies! Enjoy!

xoxo, Michelle

Friday, January 29, 2021

Hoop Your Masterpiece!

Happy Thaipusam to all those who are celebrating!

Once you have finished your stitching, it’s time to frame it! Today, I'll take you through framing your work in a hoop. We use 4" hoops for our cute Nyonya designs

Top to bottom from L-R

1. There are 2 parts to your hoop. Loosen your hoop and place the inner hoop onto 1 corner of your felt. Using a pen, trace the inner circle of your hoop.

2. Cut this circle out.

3. Using craft/fabric glue, put a sufficient amount onto the inner hoop.

4. Place the inner hoop onto the remaining half of the felt. Tug gently at the sides before the glue hardens, so that the felt is taut against the hoop.

5. Once the glue dries, carefully trim the excess around the hoop.

6. Centre your stitching over the inner hoop, with the felt facing up. This protects the back of your stitching and is great if you don't wanna show your 'messy back'.

7. Take your outer hoop, place it over your stitching and gently press down, ensuring that your stitching is still centered. Tug gently at the sides as you tighten the screw, so that your stitching is taut.

8. Once that is done, trim off the excess fabric leaving about 1.5”/4cm around.

9. Turn the hoop over and put some glue onto the inner hoop.

10. Fold the fabric little by little.

11. Put more glue.

12. Place the other piece of felt to finish up.

13. And, it’s ready! Stand it on an easel or use some ribbon to hang on the wall.

Of course, this is just one way of doing it. You can even choose to replace the felt with a backing fabric and finish off by cutting really close to the hoops. There are many possibilities 😉 

If you are concerned about dust gracing your masterpieces, you can even frame these in photo frames/ shadow boxes; or if that is not up your alley, a fellow stitcher once suggested running a lint roller over the pieces from time to time. 

Hope this helps! 😀

xoxo, Michelle

Wednesday, January 27, 2021

How the Nyonya Series came to be...

The original 5 pieces sent to A+ Gallery in Penang

Before I joined forces with Ruzanna on MiRuMakes, I had started Little Pink Factory circa 2015, accepting cross-stitch commissions for wedding and family portraits. 

Shortly after, with the help of a dear friend of mine, she managed to secure me a spot in an art gallery in Penang, where I would send my work in on consignment. And because Penang is my hometown, this held an even more special meaning to me. I thought long and hard about the series that I would debut in this gallery. I wanted something that would represent Penang and also myself. Eventually, I combined the local heritage of the ‘Baba & Nyonya’ that Penang was so famous for with my love of kitchenware. The result? A collection of Nyonya themed vintage items that you would find in Penang, back in the days.

The original collection consisted of Kopi-holic, Chicken-ware, Kitchen, Sambal-licious and Tiffin-y & Co. This development also led to me being featured in a local daily newspaper and even interviewed on national TV for a lifestyle segment! 

Then, a friend from school got in touch and ordered this Nyonya collection, but asked if I could design another in place of the Kitchen one. Thus, Teh-riffic was born! 

I'm very thankful that the series was very well received and eventually decided to make them into kits so more stitchers can enjoy them 😊

Of course, it then made sense to bring these designs over to MiRuMakes as it fit our design aesthetics. Last year, we decided it was time to expand our series and we've added Ke SiaNah, Ke Sini, Soupy Coal-ition and Mould It!.


We hope you love our Nyonya series as much as we enjoyed designing them for you 💕 For tips and tricks on how to do some of the embroidery stitches and framing your piece in a hoop, stay tuned to our blog; we will be posting about those soon!

xoxo, Michelle

Sunday, January 24, 2021

MiRuMakes Cross-stitch 101

Whether you're new to cross-stitch or just looking for a refresher after years of not stitching, you've come to the right place!

Let’s take you through the basics. Just like any other craft, you will need some tools before you begin.

1. Chart – a design of your choice

2. Fabric – Aida is recommended, as the fixed grids make it easier to work with

The fabric count indicates the number of squares per inch. E.g. 14-count aida means there are 14 squares per inch. The higher the count, the smaller the squares are.

3. Needle – choose a cross-stitch/ tapestry needle which comes with a blunt end

For 14-count aida, recommended needle sizes are Size 24/26.

4. Embroidery floss – popular brands are DMC or Anchor

5. A pair of embroidery scissors

Optional tools include:

6. Threader – threads your needles, minus the frustration

7. Needle-minder – helps to keep your needles safe

If in doubt, just pick up a cross-stitch kit, arm yourself with a pair of pretty scissors and you’re good to go! You can view our patterns and kits here.

Step 1: Find your centre


Aida: Fold the fabric into 4 to locate the starting point.

On the chart: There are arrows on both axes, and the intersecting point indicates the centre of the design.

Step 2: Let’s get it started


Each length of floss has 6 strands, separate the number of strands per the chart instructions. For 14-count aida, we will use 2 strands.

Thread your needle and push your needle up at the starting point identified in Step 1. Leave about 1-2cm of the tail on the underside, so you can secure it as you go along. 

Alternatively, you may use the loop start method. 

Step 3: Make your X’s


Each box on the chart represents 1 X on your Aida. Work the X’s by coming up at A and going down at B, up at C and down at D. Once you’ve reached the end of the row, you’re your way back by coming up at 1 and going down at 2, up at 3 and down at 4. You will now have a neat little row of X’s.

Step 4: Voilà


When you have finished, turn your Aida over to the back and tuck the ends of your floss under the stitches you have made. Give it a snip and your piece is finished!

Let us know if this tutorial has helped you! Download a copy of our stitch guide, including backstitch here.

xoxo, Michelle

Wednesday, January 20, 2021

Week 2 MCO

Funny how it we are back to where we were in March 2020. Just that the numbers are higher now and people are more adapted to the new norm - working from home, checking in everywhere they go, have temperature taken and masked at all times.

If you are wondering if there will be any more charts after the CNY Minis, there will be so just stay tuned because we have this whole year planned out. We are glad we managed to do so before the MCO restarted. As for FREE charts, there are plenty related to MCO last year. Feel free to browse through here

If you have any suggestions on what should be in our pipeline, feel free to drop us a message. We love it when stitchers get in touch with us and sharing ideas. :)

Quite quiet here eh? There is a lot going on now despite the MCO. School orientation, businesses resuming, neverending house chores...lol One thing that is not doing quite well is the kitchen. Think I ran out of juice on what to cook after last MCO. Have cooked and made pretty much all that was on the list. Right now, I am wishing for time to stitch!!! 😆

Til then...

-Ruzanna-

Sunday, January 17, 2021

Meet Ah Boy & Ah Girl!

 å¤§å®¶å¥½!Hello everyone! 

Have you experienced going to family gatherings and your family members ever only calling you 'Ah Boy' or 'Ah Girl'? On my mum's side, I've always been called Ah Girl for as long as I remember. Sometimes I wonder if they know what my actual name is 😂 So, in honour of this memory, I've decided to call this pair Ah Boy and Ah Girl! 

I initially wanted to make them into badges, but then I found these cute-sized frames that my cousin bought from Japan. With my newfound extra space, I decided to give them names and added the golden coin and ingot which are also from our MiRuMakes CNY minis collection. Tell us which of the minis is your fave 😉

Wishing you all the best of health and prosperity in the Year of the Ox!

-Michelle-

Wednesday, January 13, 2021

[TUTORIAL] Chinese Girl Buns

Since the Chinese boy is given a cute little braid, the Chinese girl would look nicer with 2 cute little buns!
So here it is...a tutorial on how to make cute little buns. Hope it is useful for your future projects too.

p/s: Pardon the sniffles in the video. It is nothing serious and we gotta have the tutorials out together with the chart for you. hehe

This is just an alternative on how to can finish your Chinese girl in the design. Great if you want to give yourself a little bit of challenge. Trust us! It is worth it. :D


Say Hello to our Deepavali Sampler!

Deepavali, a.k.a. the Festival of Lights, is celebrated by those who embrace Hinduism.  We must confess, since neither Ruzanna nor I celebra...